Sewing Vloggers

Sunday, June 28, 2015

Missing in Action

I know I have been missing in action but what a whirlwind it has been. I thought I would let the pictures do most of the talking about my past three weeks.

This is my neighbor. We write out checks to her to pay our property taxes.

This is also my neighbor. Joyce Mitchell and her husband live a quarter mile up the river from us. We see them at the post office often.

While just a little less peopled than this photo, the papparazi have been a highly visible local annoyance in our hamlet of 352 people. Do you know what it's like to have the New York Post waiting in your driveway for something to happen? You wake up to them and go to bed to them and there are many others as well.

We have lived for the past three weeks with this armed presence, and happily so. You just can't imagine. It is stressful.  They are EVERYWHERE and that is good.

Throw in a week of vacation. Like many locals,  getting out of town seemed like a great idea. I spent time with both daughters but it wasn't what one would normally call a vacation.

I had an appointment here. It was not a good appointment. Pity party.  After Mass General it was time for this:


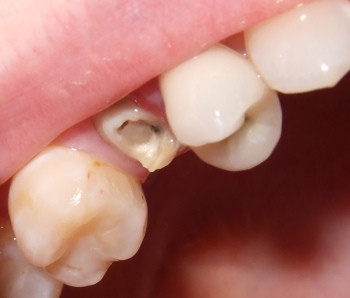
My daughter had to unexpectedly fix a broken crown in my mouth that appeared this week as well. And of course the facial pain that has been plaguing me for the past 7 years decided to come out of remission and rear it's ugly head. Tears.

Throw in two ER visits for my husband with hands and fingers swollen like kielbasas and being very sick as well. But no, we are still not done.

I came home from Boston with the construction of two new decks in full glory.


My home is a construction zone.


My glorious shade garden is decimated.

And that has been my life the past three weeks. I will return with pics of my finally finished beaded necklace and my rust dyed top but I need a freakin' break.....Bunny


Wednesday, June 3, 2015

Sewing mesh and other tips!


This combo is my latest project, really a quickie compared to the last one. This top has caught my eye since I first saw it but the tail will be eliminated. Just a bit too trendy for the amount of effort I plan to put into this top. Do you look at the garments you are making that way? I do now. Like you all, I put my heart and soul into most projects and want to get more than a fleeting fashion from the results. I like the tail, but want this top to last more than a season. So I am going for the three layer top with sleeves but no tail.. The fabric will be from my recent rust dyeing foray.

The fabric is actually a WELL WORN damask tablecloth with some deep hemstitching around all the edges, all cotton. It's in perfect shape and just feels so yummy. I put the dyeing emphasis around the edges but the overall color of the piece has changed from snow white to a lovely soft peach. The fabric is soft, like a favorite old set of sheets and I think will be very comfortable to wear.

If you look at the pattern those three layers could add up to some serious weight. To bypass that I am doing the middle layer and some sleeve embellishment  with stretch mesh. It's not that wiry tulle but a poly mesh that slightly stretches and really really looks like expensive English cotton netting. so that will be the middle layer. I did a lot of reading as I hadn't really handled this fabric before and wanted to be armed with all the knowledge I could find. There was lots of info about double layering (this stuff's sheer), not finishing seams (no need to) and more. In the end I decided on one layer of cloth and a simple cut edge hem. Easy enough, right? But this pattern has darts, hidden darts. The bottom and middle layers of the top have bust darts. The topmost  layer hangs free from the garment on one side and does not have darts. The darts will  never show but I was really concerned about how to do them in the mesh. How would I mark them? How would I keep pins in them?
. Quarter inch masking tape to the rescue! First I outlined the correct dart on the pattern with a washable crayola marker, the better to see it and just in case it marked my mesh. I laid the single layer of mesh on top of the pattern piece. I am working wrong side up. I ran the 1/4 inch tape along the dart line on each side from the side seam to the dart point. The tapes  crossed at the tip.


Next you pinch the tip of the dart and match up the tape. Because the mesh has holes and the tape is sticky, the tapes stick to each other perfectly. NO PINS! Head to the machine and stitch your dart as you normally would from the side seam to the tip. Stitch right up to the edge of the tape.


Now simply slowly peel off the tapes. I only had one teensy piece stick and it was when I pulled the tape too fast. Pull slow. One dart all done, no pins, no marking on the fabric and easy peasy!


I did steam press the mesh with a press cloth on the lowest setting. Hope this little tip helps any of you sewing mesh and needing darts.


Here's a peak at a detail of the top. I think it will be fun to wear and can't wait to show you the rest. There were issues with the draft, rather blatant, and I will discuss those as soon as I do a review on the completed top. I can't wait to wear it with all its softness and comfort. But another tip from today's sewing:

This is one of those light bulb moments, at least for me. I keep interfacing scraps and use them to alter pattern pieces like you can see at the top of this post. But the other day I was very frustrated as I could not find my box of IF scraps. Did I use them all? Maybe I did. Anyhoo, if you have read this blog for a while you know I have no use for Pellon interfacing other than to put into bags and crafts. Well, this week I took my coupon and went to Joann's and bought one yard of their cheap pellon, a lightweight with those stinkin' glue dots on the back. I took my 1.75 purchase and cut it all into one inch strips with the rotary cutter and put on my cutting table in this little box. There are TONS of strips in there and I am now ready to alter any pattern any time. Wahoo! Hope this little nugget helps someone out there in organizing their sewing space and making alterations a bit easier. When I do my necessary shortening on every pattern I use, I just make the tucks and on the back fuse the strip to the back of the tuck. The one inch width seems to take care of all the "fixes" I need to do. If I need to change the alteration, as in make the tuck deeper, I just warm the interfacing with the iron and it pulls right up. Then I readjust the pattern and press it back down with the iron.

I will have more on the Layered Rust Top soon. It's going fast. The sleeves have been muslined and remuslined and hopefully will work fine.Can't wait to get back to this project......Bunny

Tuesday, June 2, 2015

Thank you!


Thank you to all of you for your kind words and unbridled encouragement regarding the "wedding" dress. You spur on my creativity more than you know and I greatly appreciate it. Each and every comment is always savored and appreciated. 

 I love that you endorse the wearing of hats. Wouldn't the world be a much prettier place with lovely hats around every corner?  Let's face it, it's the only reason I watch the Kentucky Derby. 

A bit more info:  I pegged my skirt even more than I mentioned in previous posts, pegging each of the four skirt pieces in by 3/4 of an inch.  A total of 3 inches was removed from the skirt width  near the hem. That was done by tapering in from below the hips. This pattern really needs that, IMO,  otherwise frumposis sets in. 

I loved the collar on this dress. Many of the reviews I read stated they had a hard time getting it to fit properly. I just followed the markings and let it land wear it felt like and I think that worked out just fine. On different fabric it would be lovely with a brooch right where the two collar ends meet. 

Now, just a couple of responses to Su-z and Marysia. 

To Su-Z:    This Very Easy Vogue pattern has great fit opportunity with all the darts and cup options as well as the impressive back curvature. I don't think it will take much to make it work for most sizes without too much frustration. I hope you give it a go. 

Beading the zipper really is quite simple and as long as a back stitch is used, it is quite sturdy. My dancing proved that! 

To Marysia:  Doing a blogpost on adding a vent to a skirt sounds like a great idea! I will do my best to squeeze it in. Our home is taking a lot of our attention right now so I have to really squeeze my sewing time in with competing projects and temptations. The rain has worked to my sewing advantage but I don't know how long that will last.  Thanks for your vent idea. 

****************************


I am very near completing the Rusted Layered Tunic and here's a little tease. Last night I cut out a muslin for the sleeve and basted it in. I learned that trick from Claire Shaeffer. The sleeve is "hung" in muslin after the jacket or top is fitted and complete. Adjustments are made and a second muslin is recut and basted in if needed and I will do that tonight. If it works, the sleeves will be cut out and installed. This top feels and looks so comfy.  Sleeves always look so weird once adjusted so I will definitely sew in that second attempt. Till then....................Bunny   


Had to Refurbish This One!

    About  6 or 7 years ago , during the dawn of the Zipper Trend,  I bought one of my rare retail items. It was a blush pink and black bord...