Sewing Vloggers

Sunday, December 30, 2012

Twas the day before New Year's and......

Twas the day before New Year's, when all through the house
Machines were not humming or making a blouse.
The velvets were hung by the leathers with care
In hope that free time soon would be there.

Hubbie was nestled all snug in our bed
while visions of garments danced in my head.
I in my Jammies and Dad in his sweats decided
No party on New Years was as good as it gets.

When down in the basement their came such a clatter
I sprang from my bed to see what was the matter.
Away to my bunker I flew like a flash
Tore open the closet and eyed my great stash.

The glow of my Ott lite on cleaned closet shelves
showed amazing order put forth by the elves.
And what to my wandering eyes would appear?
Visions of fabric so vast and so dear.

There were fleeces all rolled and labeled with care
in hopes that my fingers would make things I'd share.
There were boucles all begging for Chanel's nimble skills
and 100% linen was giving me thrills. 

When up on my shelves my eyes did alight
to find glass jars of fibers reflecting the light.
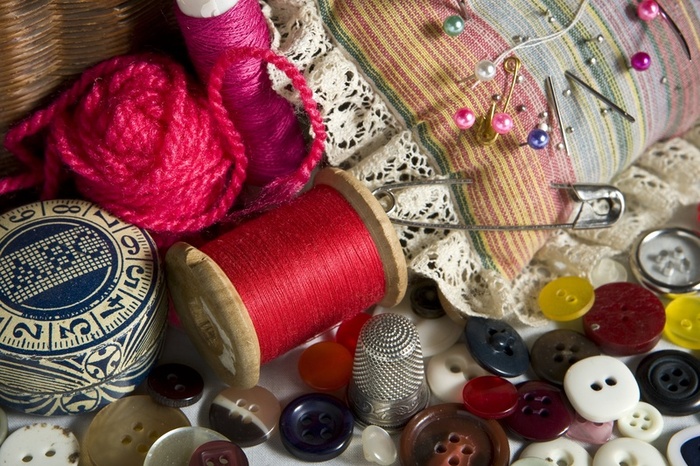
There were laces and ribbons and sequins galore
and sewing such beauties was surely in store. 

I found angelina and rovings
 all bundled with care,
 and splendiferous threads with no room to spare. 

Drawers were all perfect with scissors at rest
and tools made for marking ones marks at their best.
Buttonhole chisels, silk ribbons too, glass headed pins
asking "what do we do?"

 Polies and silk take up space by the knits. 
Their sparkly gleam giving shivering fits.
Then there were doilies and gingham so square.
With so much to sew there is no  time to spare.
Bottomweights share a really tight space, 
A perfect pants pattern will they ever grace?


 Why, here are my fingers on hands that are eager
to stitch and create, even projects quite meager. 
They'l move on the fabric with speed so unknown
Productivity will blossom with items I've sewn. 

It's time to get dreaming of what I will do 
with all I've been blessed with. How about you? 
Here's hoping your New Year will be one that's bright
 and loaded with sewing far into the night.
Happy New Year to all with more sewing in sight.....Bunny Pepin


Friday, December 28, 2012

Sewing Forward!


This is the time of year when most sewing bloggers, all sewn out from fancy party dress making or gift making, tell the world what they have accomplished over the past year. While I think I have accomplished a fair amount my holiday happiness included very little sewing due to circumstances beyond my control. But, this weekend I managed to get everything back in order in the visible parts of my sewing haven. Today we have help coming to move furniture back in the family room and this weekend is looking good for completing the whole project. We still need a staircase rebuilt. That is coming from the Amish and one must wait for their skills around these parts. Waiting is OK when it literally saves you a thousand or two. We also have a finish carpenter to come in and build our transition millwork. Seems our transitions are rather unusual and need to be built by a craftsman. I don't want to think what that will cost but we will make up for it with the staircase. All that remains on my part is reorganizing all the mess in my fabric room where so much has just been shoved. A long weekend should help that happen.

I did get my small bakers rack painted white and filled up and I so love it all. The doors still need to be hung on the closet but since I am in and out so much it will probably be the last thing to happen.

So I am looking forward to sewing, not looking back. I have great plans, not quite prioritized, but all excite me nonetheless. There will be my pants draft from Sure Fit Designs. I am really excited about that. There will be  mucho dolly clothes making for new American Girl additions to the family. Then there will be attempt number two at a classic winter coat out of a yummy black wool/cashmere mix.Throw in a couple of Koos bags, a slipcover for an ugly old wing chair that really is a quality piece of furniture, just ugly, and some of whatever I can do for some instant creative gratification. I may even squeeze in another Chanel Jacket before all is said and done and 2014 rings in. Oh, and I forgot the window treatments for my great room that have seemed to been thrown to the back of the queue. Of course, next year, you bloggers will inspire me to new heights and new creative endeavors with all the cool things you make and I will stop everything just to try one of your amazing efforts in my own style.

So I am looking forward to some serious sewing in my lovely little space and some much appreciated serious inspiration from all of you, dear sewing friends. You never fail me and are so appreciated and cared for....


I'll leave you with a shot of my bird bath which I think may be  2 1/2 feet tall. The snow line here is about 3 inches below the full height of the bird bath in this picture. It was all the way to the top a few hours later. We have had 2 1/2 feet of snow in the past week and are sitting her waiting for the next 2-5 inches tomorrow. Winter is here and we are hunkered down.........Bunny

Sunday, December 9, 2012

An Introduction...

Let me introduce you to Mrs. Mole. The name will be self explanatory shortly. Mrs. Mole writes one of the best sewing related blogs I have seen in a while . She is a career alteration expert, has a degree in fashion design, a highly entertaining sense of humor and has been sewing for over forty years, not a bad resume! Her blog,  "Fit For a Queen" , tells the tales of her many clients for whom she alters clothing. Her stories are hilarious and her skills impressive. But what Mrs. Mole has more of than anything and anybody is Patience with a capital P!

Mrs. Mole's posts are mostly text except when it comes to showing her often very complicated alterations. She does do wedding gowns and formals by the score but has her share of clients that she would prefer to throw under the bus, or should I say kick under the sewing machine"?  I have just recently found her blog through links on Pinterest and am so glad I did. Check her out. The entertainment value will have you smiling, laughing and wondering where she gets all that patience. I think she could be a diplomat to the Middle East. Just thought I would share this wonderful find with you all. If you have ever thought of going into the alteration business, you really need the reality check that this blog brings to that type of work.Through it all, Mrs.Mole still passionately loves altering clothing. I think she is a saint.

When telling her tales she changes names and occupations and never reveals her true identity, therefore the name, "Mrs. Mole."  I don't blame her. She is brutally honest in her assessments of her clients. Her honestly is coated with the best humor which makes it all a good read. Highly recommend.
*********************************************************************************


Halleluiah!  The floors are all installed and we are so glad we waited for what we wanted. They are gorgeous hickory with a yummy red undertone. They look great. Now we have to fill in all the nailholes in the millwork and give a quick second coat to the white trim. We are really happy. Some of the new furniture needed has been ordered and we are still shopping for the rest. The worst is behind us. We have guests arriving the week after Christmas so the hustle is on. When  all is said and done you will all be invited to the Grand Tour, big sigh of satisfaction here. I can't wait to get back to some serious stitching.

**********************************************************************************

Can you tell I attended a website building seminar for work this week? I came home and started playing with the blog as a result. I would like to publicly thank Shams, of Communing with Fabric,   who graciously answered a question for me and was a big help in my final decision about the "look".  I am thinking it will be fun to change my header photo about once a month to keep things interesting. What you see in the header today is a piece of silk brocade my daughter brought me back from Singapore. It is one of those fabrics I just like to admire and it reminds me of my daughter's thoughtfulness while on the other side of the planet on business. Happy Sewing!.....Bunny

Friday, December 7, 2012

I drank the Kool-Aid......


Recently, through threads on the Artisan's Square Stitcher's Guild forum and the Pattern Review forum I have become aware of Sure Fit Designs. I have drunk the Kool Aid. The very numerous results I am seeing from all shapes and sizes of women have me eager and encouraged. Their results are phenomenal. Add to that the legendary customer service of Glenda Sparling, the owner, and it is a win/win situation. Glenda makes a sale. I make fabulous, I hope, pants. Lots more to come on this but in the meantime check out the links. This is one, a biggy, from the Stitcher's Guild that shows some wonderful pictures and accomplishment.  I am so excited about this venture. Hang in there and I will take you along for the ride!

********************************************************************************

Not much sewing is happening here and won't be for a bit. Tomorrow our floors get installed and we can finally get life back to an organized normal. That will take some time. Then there are all the traditional happenings having to do with celebrating Christmas  in our family. We will be gone the week before as well. I will try to blog as much as possible, posting my opinions on various things and bringing attention to others but actual sewing will be a bit sparse for the next couple of weeks. Did I say that was killing me? It is my sanity keeper. My queue is getting quite long and I am not sure what to start first.  Working out my new Sure Fit Designs pants blueprint is way up there. So is making my winter coat. I am still all over the place when it comes to Pattern Choice. I love the coat recently completed by Robin at A Little Sewing. It has the roominess and warm collar that I am looking for. But swing coats are my siren. I think I may have to just make one up in a muslin and get it out of my system. I also considering Amy Barickman's Chinois Coat.


More sewing talk to come, actual sewing, not for a couple of weeks.Stay tuned!...Bunny

Wednesday, December 5, 2012

CAPTCHA !!!


Sounds sort of like "GOTCHA" which would probably a more appropriate title. In case you don't know Captcha is WORD VERIFICATION.  WV is that aggravating window that pops up after you make a comment on someone's blog. Because automated spammers can't read, by requiring you to read and write the barely legible letters and fuzzy numbers you prove you aren't spam to Blogger and your comment gets through. 

I hate this stuff. I don't use it on this blog. In the years I've been blogging, I think since 2008, I think I have plucked and deleted 3 spammers from my comments. I can handle that. Don't make my visitors go through this misery, Mr. Blogger, Please!!!

When I go to a blog, make pithy responses, and then am asked to read the Captcha to make my comment go through lots happens. First I stare at the damn thing and shrivel as I think, "here we go again". Once my fury subsides I squint. Is that a c or an e? Is it upper case or lower? Is it totally foggy at the home with that address number being hijacked for verification? I type it in. BUZZER buzzzzzz as in wrong answer! I don't like those buzzes in my brain. What I said is really important, at least to me so let's try again. Click the little  twirly for a new Captcha. This one is worse than the last. I swear this is getting very aggravating. Try again, fail again. I don't know about you but three times you out in my world. One more try, often on the third try the dummy's Captcha seems to come up, a little clearer, less letters, no spaces. I might make it this time. Damn! This sucks, I flunked the test. I got it wrong again. I quit, leave your blog and begin cursing. You did want to know what I had to say, right? I mean you are asking for comments so please let me comment and not leave your blog in frustration. Is anyone else with me on this? 

If you would like to disengage word verification, AKA, Captcha, go to your blogger page and click on the little clipboard drop down next to your blog, next to the one you use to start a post. Click on  overview. On Overview on the left, click on Settings. On Settings click on  Posts and Comments. Where it says "Show Word Verifications" click no and shut that sucker down. I guarantee you there will be a lot more commenting on your blog! If you see a spam commentor, just delete them. It won't hurt. 

There has been much written in blogland about Captcha. From what I've read most don't like it and disengage it once they know how. I hope you are one of those. I so want to comment on  all  the wonderful things you are sewing, give advice when asked, and sometimes just tell you that you brought a smile to my face. Pretty please........Bunny

Sunday, December 2, 2012

"Overdressed............................."


OK, what do we have here? I see gray cashmere. There's a flannel interlining. Seams are catch stitched down to the interlining. Peeking out in the upper left corner is a bit of the silk charmeuse lining. Hair canvas with some tricot fused to it to build out the back. My narrow shoulders need that double interfacing with the weight of this coat. All in all, a pretty well made jacket that will last me years.

I had this out today to open out the lining and take in the sides. I always felt the original pattern was a bit boxy, something fellow PR-ers seemed to also find. So today I opened the coat up and built in some shape by taking the side seams in at the waist. About 1 3/4 inches total was removed. It looks much better. I should get lots of years wear out of this classic princess seamed jacket. It's well made and of quality fabric.

This is not a brag. This  is all to make a point about the "high cost of cheap fashion" as the rest of the title of Elizabeth Cline's book "Overdressed" says. If this were cheap fashion the following would apply:

  • It would be made of some poly blend or all poly or even "faux wool" which I mentioned in yesterday's post, something using up our petroleum resources and causing pollution in the process. 
  • No interlining
  • No catchstitching
  • No custom fit
  • No silk lining
  • and certainly no retro fitting the garment because number one, it was cheap to begin with and the seams are near non-existent.  Number two, most people don't know what good fit standards are anyway today. But you do dear sewists. 
  • It would more than likely be  donated to a good charity who really doesn't want it either because of it's crap nature and it would eventually end up in landfill. Or, it could go to the back of the closet with mound of other cheap, easily replaceable forgotten fashion.
  • The coat would have been constructed using  labor practices that would make you cringe.Our economic competitors evidently don't know or care about the Triangle Shirtwaist factory fire.
You know what quality garments are and what it takes to make them. Your clothes, should you choose to go the well sewn, good fabric route will last far longer than the trash put out by the subscribers to Fast Fashion, the Targets, H&Ms, Walmarts, and truthfully, nearly every clothing retailer  dotting our landscape.  You won't be contributing to the massive carbon footprint taken up by tens of thousands of cheap fashion factories. You won't be contributing to horrific labor practices either. You sew.

I know you can tell I just finished reading Cline's book. EVERYONE should read this, not just sewists. You will be so proud you sew. I am proud you sew. This is not new stuff. I've been hitting resale shops since I was a teenager. I've also been making nearly all my clothes and doing serious recycling since then as well, way before the word even existed. It's fun. I enjoy it and its very satisfying. Cline just seems to put this all so well into words. She uses loads of interviews, facts, figures, and trips around the world she personally took to make her point.

So I will get off my high horse now but you are totally welcome to join me. Make your clothing. Use the best fabrics you can afford. Take every class you can. You are impacting your world when you do.....Bunny

Friday, November 30, 2012

What the................

frick is Faux Wool?  I have just come off of reading " Overdressed: the high cost of cheap fashion" and this just fries me. That book has given me religion and sharpened an already existing attitude toward fashion and clothing. I highly encourage you to read it. It's a quick read and extremely informative. You will so value your sewing skills when finished. Faux leather saves animals. Faux wool ruins the environment and never mind the Bandladeshis who are cranking it out for 43.00 a month pay. This is not good stuff.


 This was the view from the dining room this morning as winter finally settles in here. Last night brought us six inches of snow and a wakening temp of one below zero. Hope your day is warmer than mine....Bunny

Monday, November 26, 2012

Fabric play


Time for some fabric play. I dug out this linen which goes beautifully with the Koos #2 bag and played around with some smocking. I smocked most of the evening yesterday and am near done. This will be either an insert or applique somewhere. In the meantime, it put my head back into very pleasurable sewing. Now I am ready for the next project!...Bunny

Sunday, November 25, 2012

I'ved moved on and Why.......

I gave it my best effort but at this time of year, I just don't have the patience. This is my first "quitter" in years. While I think I have improved the bodice that ballooning out of the bodice at CF is ridiculous. WTF is that? While I may beat out Andrea Mitchell for the most narrow shoulders in America, I have never had a CF balloon out like this. My decision at this point: This is way too poorly drafted to waste any more of my valuable time. Oh, I could fix it,

by adding a couple darts......

but I haven't even begun to work out the sleeves or collar yet. I will write this one off and move on. I am needing me some handwork, something fussy, that I know I can do pretty well. I am going to work my way through the back room mess to see if I can rustle up some grey silk or something for the next Koos bag. Wouldn't a bit of contemporary smocking be great on that? Hopefully that won't be another great idea that goes South. I'm moving on. Eat my dust, Marcy Tilton, Vogue 8676........Bunny

Thank you, everyone, for all your very great input.  You gave some great info, advice, and empathy, always so appreciated....Bunny

Saturday, November 24, 2012

Vogue 8676 Muslin Continues

I am quickly losing the love for this pattern. I am going to give it another go and have spent the day reworking and recutting a new muslin. I will put it together tomorrow. The armscye measures 17 inches. To put that in perspective I took a measuring tape, made a 17 inch loop and clipped it, and put a roll of tape in the middle. THIS IS SMALL. And I'm pretty small . Who is this fitting?

At this point I have made so many adjustments my head is spinning. Fingers are crossed and as Ms. Scarlet O'Hara said, "I will think about it tormorrow."...Bunny

Friday, November 23, 2012

What a difference a day makes! Vogue 8676 Muslin

DH's muslin shots are getting better but there is still a big learning curve. Anyhoo, here's my breakdown so far on the muslin. I cut this with no facings and to the  center front front edge.  I checked and rechecked  and I used the neckline measurements and collar measurements correctly despite changing from a lapped seam to a conventional seam.

  • A definite FBA is needed.
  • This jacket does not have room for the thinsulate lining  IMO and I may cut a larger size. I am thinking of putting the quilted lining together and then making the jacket after to fit it properly. I will cut large seam allowances to compensate. 
  • The neckline is nothing like the pattern OR pictures I have seen on Pattern  Review of completed jackets. Here's what I think is happening and feel free to give me your two cents. Being five feet tall necklines always fall way too low for me despite taking out between the bust apex and the shoulders. I am thinking raising the front neckline to bring it in closer to my actual neck. What do you think?

This back pic shows the major issues.

  • The armscyes feel very tight and high despite my lowering them a half inch already. Cut them down more? 
  • Wicked sloping shouldes.
  • The biceps are snug despite my adding a bit there. I can add to the armscye by lowering it and then widen the  sleeve seam allowance to fit in more bicep.
  • The jacket is hanging off the shoulders. I also think it needs to be raised  a bit where it meets the sleeve. I would like to use a small shoulder pad and this would also need to be accomodated.
  • Again, the neckline - too far away from my long skinny  neck in the back as well. I think I will redraw the whole thing to bring it in closer. 
Here you can really see the needed FBA as the front hem is being pulled up by my boobs. You can see also the low profile of the neckline, not like the pattern at all. There's that tight underarm again.

I think I will just cut a larger pattern, make the narrow shoulder adjustment, deal with the armholes, oy.......I will persist! This has to accomodate the quilted  thinsulate interlining. Go up one size? two sizes? I am thinking two.

Yup. this is my flannel jammies, no makeup, post migraine self.  I get them maybe 2-3 times a year and today was the day. Thankfully, it lifted after an afternoon  sleeping and down to the cave I went.

Any input is greatly appreciated. I have contacted Banksville Fabrics and they are sending me swatches for the lining. I am leaning toward an acid green or royal blue silk charmeuse. Can't wait to see what they come up with....Bunny
 

Thursday, November 22, 2012

Vogue 8676 Begins

I am going to call this the MT  Jacket. It is a Marcy Tilton design from Vogue.

Today I cut out the  muslin for Vogue 8676. I did some Flat Pattern Measuring and there seemed to be a fair amount of ease in this pattern which a jacket pattern should have. I need to be able to wear a heavy turtleneck underneath and still be warm and comfortable. I got my muslin nearly complete and will finish that up with pics this weekend. I have discovered a few things about this pattern already.

I did my usual petiting of the pattern. I always follow this with an FBA and enlarging the bicep area. I took a chance and did neither of these adjustments due to the amount of ease in the pattern. Upon nearly completing the muslin I can say so far it looks pretty good. I will do a small FBA as the center front could hang just a tad better than it does and will also add a bit of extra in the biceps as well.

I like this pattern. It has a really nice curve in at the waist that isn't evident in the pattern photos. It also has a killer sleeve. The hem is slightly pegged.  Look closely at this pattern piece. Left is back. Right is front.
It is on straight of grain. The ruler is following a line in the cutting mat. Do you see the difference from left and right? The back is fuller, longer, and convex. The front of the sleeve is shorter and concave.  This is how Kathleen Fasanella says to draft your sleeves and Marcy Tilton has done just that with this pattern. One of the sleeves is installed in the  muslin and it looks great. I am going to do a  bit of addition to the bicep. I may make a hard copy to use with other patterns. Here's a couple other observations:

  • The back hangs beautifully and so far no need of a swayback alteration. That's a good thing and doesn't happen often.
  • This pattern is meant for stretch knits, boiled wools, or fleeces. There is no lining and just a folded under strip of bodice for a front facing. Seams are meant to be lapped and exposed. 
  • I will be making this with a lining quilted to thinsulate for warmth so I will have to draft a lining pattern.
  • I will be using facings as well so will need to draft that also. 
  • I am using a woven, nothing with stretch so this muslin and it's adjustments are really important.
  • I'm using some vintage corduroy for the muslin as the "real" fabric is a cotton velveteen. 
  • The shoulders appear to be slightly extended in the technical drawing. They do on me as well. Others who have made this don't have the dropped shoulder. I couldn't discern if they cut the shoulder back and should I or do I leave a slight drop to the shoulder as you see in the tech drawings.I am doing View B but have used the back with the CB SA from A in case I needed an adjustment for swayback. 
  • The neckline is tricky. On some photos of this jacket the weight of the collar causes it to hang and it did on me as well. On others the collar overlaps and looks pretty good. 
  • I am thinking quilted channels in the neck and cuff areas. I'll do samples first. 
  • I still don't have my lining fabric, boo hoo.
  • Tilton's instruction's have you install the sleeve "flat" not something I am a fan of. However I did this on the muslin and it seems OK. I haven't firmed up on how I will  handle this yet and need to see the muslin totally done.

 So that's where I am with the muslin. I hope to have these kinks all ironed out  and be wailing away on on the machine really soon. More to come....

Tuesday, November 20, 2012

I am giving Thanks....


I have so so much to be thankful for. I sure hope you all do as well. I know times can be rough, particularly in this crazy economy. Let's hope it gets better for all who need it to really soon but in the meantime there is ALWAYS much to be thankful for. Just a few of the things I am so glad and thankful about:

  • My patient, loving husband. He has been with me since I was sixteen and truly loves me. I so know that. When you have been together as long as we have and weathered the storms we have, each year becomes a bigger treasure than the last. 
  • My beautiful two daughters. They are blessed with loving, caring husbands, and have blessed us with 5 wonderful grandchildren that truly make life worth living. They have turned into caring, productive adults. No Mom could ask for more.
  • I have a warm home in a sometimes scarily cold climate and a husband who tends the woodstove carefully and responsibly. There are many fires around here from woodstoves. I feel safe.
  • My stash of fabric, really quite small compared to many but just what I need. It is loaded with lots of vintage fabrics, laces, and buttons that bring on memories that make me smile and that makes it big enough.
  • A Mother and Grandmother who gave me the love of sewing, and the freedom to be creative. They encouraged me to be creative. What a gift!
  • A wonderful job. I work with amazing women, not a bitch anywhere! It is truly a blessing to work with wonderful women who do their jobs well and care for others even more. I treasure them all.
  • The wonderful sewing sisterhood. You all encourage me, inspire me, make me laugh, make me cry, and make me spend money!!!
  • My health, and a brilliant neurologist. For the first time in 4 1/2 years I am pain free from something that has made every day and night difficult. He corrected a long misdiagnosis and all that entailed, treating me appropriately for, in his words, "an extremely rare condition that is almost always misdiagnosed"  and gave me my life back, really. I was getting pretty discouraged for a while there but it is all behind me now. I thank God for this every morning when I wake up, such a blessing.
I have much, much to be thankful for. I know you do too. May your blessings continue, may you be surrounded by loved ones on the holiday, may your creativity flourish and your health be trouble free. Bless you all and know you are cherished......Bunny 

Monday, November 12, 2012

The Koos Bag Finis!


We were blessed with a gorgeous day here for photos and DH did as directed so they are not too bad. The bag has nothing in it so is a bit puffy. I absolutely love it. I think this will be perfect for travelling to visit our children. It is BIG and has sort of a luggage-y feel all of which I love.  Here's the 411:

PATTERN: 

Vogue 1311, a bag designed by NY designer Koos Van den Akker. He is recognized by his collaging of fabrics,  love of bright color and simple designs. His designs function as a canvas to showcase a clear passion for fabric and color.  

I don't think I ever would have tried this pattern if it weren't for the inspiration provided by Shams of Communing with Fabric.     Her bag with it's vivid colors is TDF so please check it out. 


  FABRICS:

100% quilting cotton that I don't like for the applique base

 Fusible fleece

Assorted home dec fabrics that were inspired by the original tapestry chosen. There are embroidered taffetas, stretch velvet, two different faux leathers one of which became the straps, a tacky red metallic stretch fabric for a bit of highlight. That came from the  "Halloween department"  at JAs. My personal opinion, based on what I was taught years ago, is to always have a dominant fabric which will cover more than half of the area. Here it is the ginko sort of looking tapestry. Loved the colors in it. If an item is covered with an equal amount of every fabric it is not quite as interesting as one with a dominant fabric and accents. (From my days of interior design).

Some matte gold sequins. 

A brass upholstery zipper.

100% poly fabric for the lining. This is that nasty stuff called "Silk Essence" at JAs. I generally detest poly silkies. They are hot, clammy, and love to pucker when stitched, horrible for a lining. But this supposed lining fabric is great for bags as it comes in tons of great colors, is inexpensive and always available. I try to use light colored linings so items don't get lost in a big black bag hole.


 CONSTRUCTION:

This is really quite simple to construct. You can use Koos's plan for your collage of fabrics or you can simply use the basic shape as I did to do you own thing. The bag consists simply of a big circle for the top and bottom and a 8 inch band in between. Here's how I veered from the pattern:

  • Fusible fleece was fused to a base of cotton that was cut to the three necessary pieces, top circle, band, bottom circle  (not including straps and buttonholes). This then became my canvas on which to stitch the appliques.
  • There is a great, new to me, technique Koos specifies for the zipper. Love how it came out  and you can see that here on The Koos Zipper.  I can see a lot of potential for this technique on future projects.
  • The applique fabrics were basically stitched and flipped, a technique used in many quilts particularly Log Cabin quilts. 
  • In the SAs each sequin was cut to its center hole and slid off the connecting threads. I wanted to keep the threads so they could get caught in the SA. 
  • Once the applique work was done this went together quite quickly. On the shell I had stretching issues despite carefully stay stitching and clipping. On the lining the pattern matched up perfectly, proving a nice draft. So be careful with all the handling of your fabrics and take all the precautions to not stretch those edges.
  • The straps were made of faux leather. I used a size 14 stretch HS needle for that. Sewer's Aid, a silicone sort of thing, was rubbed on the needle shaft, under the presser foot and on the Fasturn tube used to turn the straps to the right side. I don't use any special foot when I sew faux leather. 
  • I blew the wonderfully unique Koos buttonholes. I found myself in the zone and unconsciously proceeded to stitch down the appliques for the BHs instead of making the neat "butterfly" version that Koos teaches. Oh, well, maybe the next one. And there will be a next one! This was too much fun. 
  • I added extra stitching to the area where the straps connect to the bag as suggested by Shams. How much weight does she put in that thing? I'm glad to know I'm protected for heavy loads!
  • I wrote my initials and date on one of the F leather applique with a paint pen that I wrongly attributed to Sharpie. It is made by Krylon and works really nicely. No bunny tags on this one.
 
CONCLUSION:
I will definitely make this again. It is just too simple and too much fun. One thing I would suggest that is different from my beginning post on the construction (a few posts back) is the choosing of the fabrics. I went through a whole process of imagining and then labeling each fabric with the piece I wanted to use. That was no fun. I chucked that idea and just piled up all my fabrics and picked them out piece by piece the way a painter picks his paints. That's a lot more fun!


I highly recommend this pattern if you want a bit of a challenge, some great fabric play, and a super new big bag.
********************************************************************************* 

 These are fabrics I am considering for my next iteration, greys, soft brown, pale turquoise. Have more searching to do before firming up the pallette.

***********************************************************************************

No new floor yet in my space but it's coming. In the meantime I played with my lights over the machine. I really want my dominant neutral to b white. I have been drooling over some of those lace covered lamps on Pinterest. Here's my attempt. I simply sponge painted the glass shades with white acrylic paint. It looks like lace from afar and gives a prettier glow to the light.


Friday, November 9, 2012

The Koos bag continues...construction notes

The entire outer Koos bag, Vogue 1311,  is complete and I must  say I love it, particularly it's ability to function as a backpack as well. This is a BIG bag. I am a small women, and with the fabric I have chosen it has a luggage-y look, albeit rather funky. I should have pics up as soon as I get that lining in over this long weekend. In the meantime just a few hints about construction that I wanted to pass on:


This bag consists of two large circles with a 8 inch wide band in between, major bias connected to major straight of grain. The seam allowances are half inch. 3/8 of an inch from the circle's edge I staystitched and clipped back. Watch your clipping here. It should be on the bias to prevent fraying and as you clip your way around the bag the grain changes. The angle of your clips should as well.

I put the circle and band together as any circular piece, quartering both pieces and matching up the quarter marks. Despite my best efforts something stretched somewhere. I stay stitched. I recut each pattern piece as I went along to keep it true. I used a tight cotton backing to prevent stretching which is not called for in the pattern. I still was left with an odd amount of "band" at the end of working my way around the circle. Because this happens so often when stitching bias to straight grain I did not close up the band until it was nearly all pinned in to the circle. Here you can see what was leftover.

Not quite a half inch seam allowance! And it wasn't even from one side to the other. But it worked and in the end all got fit in and then the SA clipped back to a half inch.

To attach the circles to the band I worked with those quarter marked areas sewing and pressing the SAs open on only one quarter of the bag at a time. This made it much easier to get my ham in and press the SAs open. Sew a quarter. Press a quarter open. Move to the next quarter of the bag, repeat until done. Sounds like a cake recipe, huh? Also remember to keep that zipper open as you sew up the bag. It  will give you more room to maneauver around the machine and won't let you get "locked out" from turning the bag when done. Yup, I've done that one more than once!

Once this shell was complete I had the fun of "signing" my bag, WTH! I use a "gold leaf" pen by Sharpie and  signed the bag on one of the faux leather sections. If you ever decide to do this, and you should, do several practice attempts before committing your initials to your project. It will help clear the pen of blobs and you will get a feel for the technique before signing. That signature made me feel good! You'll get to see it when done.

So this weekend will be put the lining in and Tah Dah! See ya then........Bunny


Friday, November 2, 2012

Koos bag continues......


The bottom of this drum shaped bag is collaged as well. I decided to have a bit of fun, again, not quite following the pattern. One curved inlay was triple zigzagged over the raw edge and then topstitched on the side. Another section was stitched right sides together, flipped and pressed and then topstitched (the tapestry). I wanted to bring a bit of the green to this side of the bag. The tapestry has some floral shapes and I thought mimicing them with a green taffeta applique would be fun. 
First I traced the flower shape onto tracing paper.

Then the shape was cut out and pinned to the tapestry.


The applique was then triple zigzagged and free form stitched to mimic the flower on the tapestry. I like how I now have that little pop of green.


Now it is on to the sides of the drum, more fun opportunity to play with textures and shapes!...(Don't you just love my joint compound spattered cement floor? At least my room is usable for now.)
...Bunny

Thursday, November 1, 2012

The Koos Buttonhole....Almost!


Here you can see the back side of the strap coming out of the faced buttonhole. There are four of these on the top of the bag and they look pretty cool but.....mine are not like the pattern. Koos has a signature buttonhole that has been used  on other of his Vogue Patterns. It is three dimensional and reminds me of a butterfly.  Mine would have been quite decorative too, but in my sewing enthusiasm, I just kept on sewing and turned the facings and stitched the squares down literally unconsciously  . I was on auto pilot.  It looks pretty good but did not have that butterfly look as shown on the pattern. Ripping it all out was not an option.  So it stays.


First the edges of each buttonhole square were pressed in using a template and some steam. This is a 100% poly  fabric and therefore not anxious to hold a press. I have had very good luck pressing polies by steaming over the template, with a pressing cloth, and as I slide out the iron I literally slide in the wooden clapper. I rub the clapper back and forth, give it a chance to cool a bit than lift it away. The resulting fold is nice and crisp.
The sharp press then made the corners easy to miter. After mitering the edges were trimmed back and the squares were ready. They were sewn right side to wrong side of the bag top.  I used a 1.5 stitch length and stitched in the little box. The box was then cut open with the little triangles at the end like any bound buttonhole. Then the facing is turned to the outside. 
This is where my stream of consiousness kicked in and I pressed the squares and topstitched them down, totally forgetting to turn them into butterflies. The next bag, and there will be another soon, will have the butterfly BHs. 

Once turned to the right side they were pressed and topstitched around the edges. The straps were tucked in and stitched to the BH opening on the "wrong" side of the strap which is the inner edge of the BH hole. 

Next steps are constructing the bag bottom and then the sides. I think all the hard parts are done at this point and the rest of the construction will be pretty standard. I'll show  how I embellished the back in the next post....Bunny


Tuesday, October 30, 2012

It's been a while!

It's been almost a month since we last hooked up. Lets see what's been going on.

  • A long weekend spent watching grandchildren while Mom ran the BAAA half marathon in Boston for Dana Farber. We are so proud of her. Her goal is always to finish and stay healthy and she more than met her goal, coming in, in a field of 7000 runners at two hours, 20 minutes. And while she was running her heart out her darling son got a broken arm while playing with his cousins  and we all spent the next crazy 8 hours in Boston Children's Hospital. Grandma hadn't ridden in an ambulance in a long time. That EMT was cute.
  • Next weekend was spent in the White Mountains with an amazing celebratory weekend for DD's milestone birthday. Hey, if I tell you which one you'll start doing my math! Her hubby threw an incredible party that included two gorgeous B&Bs, hiking Mt. Cardigan, a gumbo party at their almost built new camp, fireworks, lots of great close friends and family and it all was a total surprise. It was wonderful. 
  • DH an I both got a two week long flu, very nasty but we are finally better. Naturally he will tell you his was way worse than mine.
  •  Do you know how bad your house, laundry and cleaning gets if you have been dog sick for two weeks and away from home another two weeks? 
  • Did you ever make Halloween costumes amid all that? One angel outfit Fed Xed to New Hampshire. One very happy little grandaughter.  
  • Did you ever put in an entire new septic system under these conditions? Now besides having disorder in the lower level of the house our yard looks like a hell hole witha white plastic pipe sticking out of it. "We'll seed in the spring" says hubby. 
  • Let's add in my wonderful full time job which I wouldn't pass up for anything.  
  •  Of course the lovely floor we picked out is on back order till mid November. We will be lucky if our home is back in order for Christmas. Christmas, oy,,,,,,,

So that is the gist of it all. You all know I do not do well in disorder. I've had the best intentions, and gone down to my cave many times but just couldn't handle the mess/stress. I took this past weekend shuffling things around and making believe my sewing room was back on line. Now I at least know where things are and won't have to use up 45 minutes hunting for my bead box. So, now I am back feeling the sewing love, back to having a bit more time, I hope, and back to blogging. I missed you all and have lots to show and tell.I am hoping for a shot of my granddaughter in her angel outfit but in the meantime here it is in the messy closet. 


DD sent me a little knit dress in the mail and asked if I could copy it exactly as it was a perfect fit, oh, and make it look like an angel. Sophie will wear a white turtleneck and leggings underneath and she will sport wings and a halo thanks to Target. This daughter of mine has a Pinterest board, "Things I want my Mom to make". Really....The edge is bias poly sheer with sparkly little dots all over it. That bias saved me a lot of aggravation. I didn't even gather it. I just kept shoving it under the presser foot. But I met the deadline, DGD is happy, and so is Mom. 

It was truly guerrilla sewing.

I have been working on the Koos bag now that life is a bit easier. More to come on those crazy buttonholes.
Thanks for your patience, kind wondering emails, and being a follower of this blog. I appreciate each and every one of you all.....Bunny

I leave you with a pic I took this morning, the day after the Perfect Storm. I walked out the door to go to work and there it all was, including the geese.


Had to Refurbish This One!

    About  6 or 7 years ago , during the dawn of the Zipper Trend,  I bought one of my rare retail items. It was a blush pink and black bord...